create.

"As you take the normal opportunities of your daily life and create something of beauty and helpfulness,
you improve not only the world around you but also the world within you"

Dieter F. Uchtdorf


Showing posts with label photography. Show all posts

Saturday, October 1, 2011

Photo Decorating Ideas!


I am always looking for FuN and creative ideas to decorate with portraits online...so today... I thought I would share a peek at a few ways I have decorated with portraits in my home!
These ideas are very SiMpLe...and EASY on the budget.   

First off...these Simple Picture Boards made from 1/4" MDF, a little black paint for the edge, Mod Podge,  and your photo.  The size of these are 12x12.   A fun alternative to the regular 'ol frame!


Chicken Wire Photo Hanger (made from 1x4 cedar fence wood...and chicken wire.
We use this to hang random pics throughout the year...then when the holidays hit I use it to hang Christmas photo cards.


Just a few display ideas...


And... last but not least...my Cupboard Door Photo Hangers!  If you are familiar with my blog...you have prob. already seen these...but had to share anyway...being my favorite!  You can check out my tutorial on how I made these here!  {SIMPLE}


Well...there ya have it...hope this might give you a little inspiration to get those pics up!!

Also...don't forget to check out Kristin Duke's "Decorating With Portraits" Series for more decorating inspiration!!


Photobucket

Friday, March 4, 2011

Photography Friday- Dodge it!

Welcome to Photography Friday!

It's Camilla from CioCo Photography back again! Huge thanks to Stacie for filling in for so many weeks. Our first child was born on January 20th and we couldn't love her more! We feel so blessed! Since I love photography, the poor child has been subjected to countless photos in her short month of life. She'll appreciate it later in life right? ;) Today I just wanted to share a quick tip for something that will make a BIG difference in your photos.

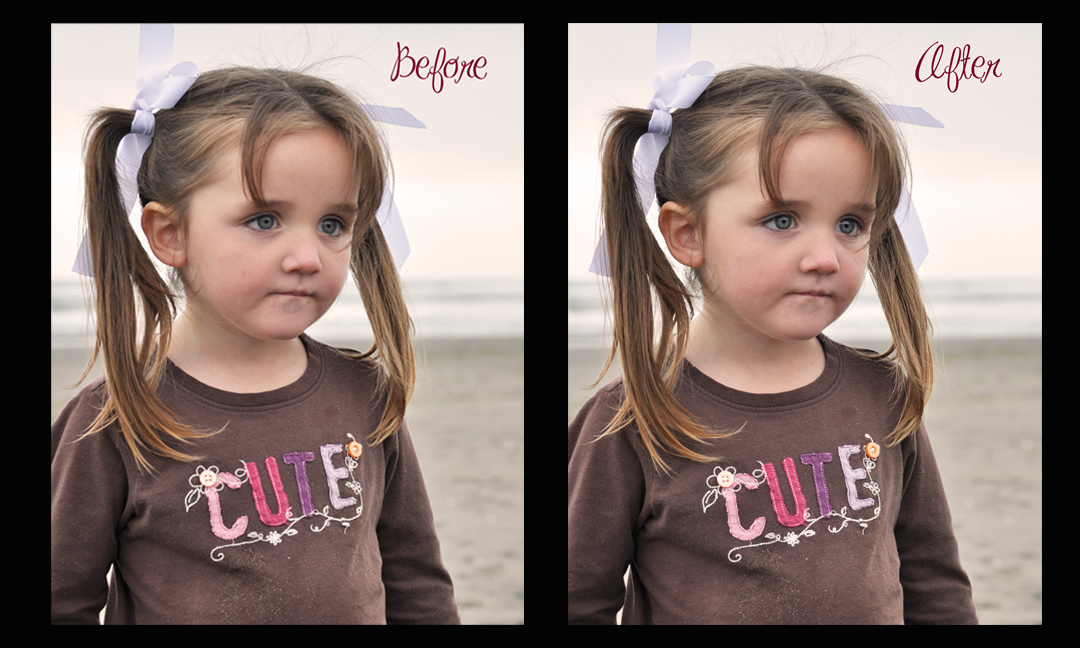
The first photo is sooc. (Straight out of Camera). I used window light, but also compensated with a speed light on top of my dslr. This look can be achieved without a flash, you just need adequate lighting. The key truly to any good picture is your lighting composition, but we'll talk about that in a future post. Today we are going to talk about the simple photo shop tool I used to lighten the picture. It is the dodge tool. The only difference between the top and bottom pic is dodging.
 Most of you will know about the dodge tool and use it frequently, but for those who don't make it your new best friend! :) It is circled on the left in red. This is a cs window, but it should be similar to Photoshop Elements. I think it looks like an aspirator, but that could be because I'm around a baby all day. Haha. When I use the dodge tool I typically will use it to lighten faces or iris's in the eye. I keep the opacity (circled at the top) to about 35% so the lighting is very gradual. I also focus on the mid tones, also circled. I like to also use it to outline a subject to give them a little pop away from the background, as I did with this picture.
I think it makes a big difference in your photos and draws the attention in. This bottom picture has the dodge tool used, the burn tool like Stacie mentioned in a previous Friday, and a curves adjustment, which we will also talk about in a later post. So have fun dodging!! Try it out on whatever photo you like, and come back with the before and after and link up! Have a wonderful weekend! (I'm going to go cuddle the little one some more). ;)


Friday, February 18, 2011

Photography Friday- Cropping FuN!

Welcome to Photog Friday!!

Today...I just wanted to show you a quick lil' sample of how I made the SAME photo look so different... simply by cropping.  Check it out:

Original:


Too Fun!
 There are ~however~ goods and bads to cropping.  The good is that you can create these FuN angles that maybe you didn't see at the time you were originally taking the pic.  The bad is that the more you crop your image...the lesser quality your image might become.  So...you have to keep that in mind, but don't let that discourage you...try it out and experiment with it.  It is amazing the different angles and views one image actually can have!  :)

HapPy Picture Taking :)

   Photobucket

Friday, February 11, 2011

Photography Friday-a FuN way to get those colors to PoP!

Welcome to Photography Friday!! 

Thanks to all of you who participated in the editing fun photo of my daughter.  You guys did AWESOME!  I love every one of them...and also...thanks for the sweet comments about her  :)  How could  she be so stinkin' cute...but be sooo naughty at times :) ...lol!  She seriously knows how to work her magic with her eyes :)
 Well...today I thought I would  share one way that I like to make my colors pop in my photos.  To do this tutorial I used Photoshop Elements 7.  I have had quite a few e-mails regarding what program I use...and if I like it.  Well...I absolutely LOVE PSE7!!  There are a few things that you can't do that newer versions can...but  I think it is a great beginner program for anyone who wants to learn editing.  In the future I will probably upgrade to the newer versions...but for now this one is working for me. :)

Sooo....this is the photo I am going to work with today:
{Aren't my nieces beautiful!} 
I just wanted to add a little more of a pop to a few of the colors in this photo...like greens, yellows, and blues.  Here's how I did it:
First I opened my photo in PSE7...then I wanted to lighted it up a bit...so I went to:   Layer, New Adjustment Layer, Levels...and lighten your photo to your liking. Then hit OK. This is how I did mine:
Then make sure you have your background layer selected...and go to Layer, New Adjustment Layer, Hue/Saturation, and the box will pop up and you can name this layer if you'd like, then hit ok. Then you have this box:

Click the drop down arrow where it says master, and select the color you would like to make pop. If you don't select a certain color...when you go to make your adjustment it will effect your whole photo and that's not what i want to do...so I am going to select green to bring out the tractor seat a little.   Sooo... move your saturation slider to the right and adjust to your liking. Then hit ok. Then repeat that step and do this to all of the colors you wish to make pop. I think I'm going to pop the yellow in the tractor wheel... and the blue sky a little.  

When I adjusted the blues...it made the jeans on the girls look tooo blue...so I am going to leave the blue saturation on the sky....and take it off of the girls jeans. To do this... make sure your blue layer is selected...and over to the bottom left...your black is your foreground color and you white is your background color...and I chose a soft round brush.  (check out the red arrows)
Then I brushed over the jeans to desaturate that blue. {Note:  You can see over on the blue layer "below" the black marks on the layer that shows where I took the blue saturation off}.

Then to finish the photo off...selected the background layer...then the burn tool, and I burned the edges at a  26% exposure.  Also... I added a little more "umph"...and bump up the contrast by clicking Layer, New Adjustment layer, Brightness/Contrast, then I moved only the contrast slider to about 73.  Here is my before and after:

Before:

 After:

Photobucket
Now it's your turn!!  Link up your before/after color pop photos!  
You are welcome to use the first image at the top of this post...or one of your own.  Also...if you'd like to share how you edited  yours{if it's different}...that would be great too...but it's not required.  Just Have FuN!

Here's the link:


Photobucket


Friday, January 28, 2011

Photography Friday- Photo Edit Fun!

Welcome to Photography Friday!
First of all...thanks so much to those who have linked up your "Fun with "HEARTS" ideas from last week.  You guys are awesome and so creative! {If you haven't check them out yet...go here!}  The link will be open till Valentines Day for those that have thought about doing it.  I can't wait to see them!

Well...today... I was thinkin' we could have some fun editing the same image.  This image is one that I took of my daughter while she was playin' around on a little bridge.  I am in love with candid shots...and thought this one turned out sooo cute!
Here is the original:
Photobucket
...and my edit:
Photobucket
I won't go into complete details on how I did mine...but to give you an idea:   I cropped the image... adjusted the color curves...bumped up hue/saturation a little...played around with the levels...adjusted color, and sharpened eyes ...then with my brush set at a low opacity...burnt the edges.
Phew...... :)
Now it's your turn!!! 
I would LoVe to see your fixes for this same image!  You are welcome to explain what you did and which program you used...but you are not required.  Just have FuN!
Here is the link:


Photobucket

Friday, January 21, 2011

Photography Friday- FuN with "HEARTS"

Hi All!! 
Welcome to Photog Friday!! 
Since Valentines Day is just around the corner...I am going to show you how I added a little "heart LoVe" to the photo's below.  On this first one...I cut out a bunch of hearts with my Cricut...then taped them to my wall.  Then...had my daughter pretend she was blowing hearts out of her hands.   I have seen similar pics on the web...and think they are so FuN!  There are many CrEaTiVe ways you could use this technique!    

Photobucket
On this next photo...I simply created an overlay in PSE7...by creating a new image, blank file.. making sure the background is transparent.  Then using my brush tool...select color and draw or dot your hearts...then simply grab that file from the bottom and drag it over the photo you wish to overlay...and it should be there.  Adjust the size to your liking...and on your layers pallet click overlay {if you'd like}.  Then adjust the opacity to your liking...and your done!   
Photobucket
Such a FuN way to add instant awesome-ness  to any photo! 
Now it's your turn...I'd LoVe for you to show us your FuN "Heart" pics!!  Have Fun!!
{P.S. Camilla...CONGRATULATIONS on your sweet new baby girl!!!}
Here's the link:


Photobucket

Friday, December 24, 2010

Photography Friday!!

Photobucket

Wishing you a VERY Merry Christmas from Camilla and Stacie! We'll postpone photography Friday till next week for Christmas, but you'll have two weeks to work on the photography challenge. The challenge is.... "New" in honor of the New Year. So take a picture of whatever speaks 'new' to you and we'll have the link up beginning next week.
Happy Holidays!!

Friday, December 17, 2010

{Photography Friday} Making those eyes PoP!

Hi all...Stacie here and today I was going to show you a quick and FuN way that I found to make eyes PoP without using actions!  Here is my before/after:

I love this technique because it just adds to the beauty of her natural eye without making it look fake.  Here is the awesome video that I found on YouTube...that gives the complete how-to using Photoshop Elements 7!  Check it out!

Now it's your turn!!!  Link up your before/afters...and let us know if you used this technique...or another!  Can't wait to see them!!


Photobucket

Friday, November 26, 2010

Photog Friday!!

Photobucket
Camilla here! Thank you SO much to everyone(400+!)that responded last week, I am so excited to be here with you and be able to share one of my favorite things in the world! From the poll we learned that the majority of the readers here have a HIGH interest in photography and that this would be a great thing to do! Most of you also own a mid-high range DSLR- this would include the Nikon D200 and up, or the Canon 20D and up. A big number also own point and shoots and low range DSLR's, so we will cater the teaching so everyone can join in!

The majority was also interested in being able to take better photos of their family, by learning techniques in manual shooting, photoshop, and composition skills. We will also try to answer specific questions in the coming posts, so please continue to comment at the end of the post. If you did ask a specific question in the poll, I received 10 of them, but the remaining 30 did not get posted by the server, so feel free to re ask at the end of this post. And of course, if you have specific questions, please feel free to email me ciocophotography@gmail.com with 'Question from Crate' in the subject line, and I'll get back to you as soon as I can!

So now that THAT'S out of the way, we'd like to introduce ourselves a little more! My name is Camilla and I own CioCo Photography, a company I started in July of 2009. I have loved being able to have a creative outlet that pays me, I mean, who wouldn't want that? I married my husband in December of 2008 and we are expecting our first child, a girl, in January. We live in Salt Lake City, UT and love it. He works in construction management, and I take pictures, so that makes super exciting dinner conversations. "So how did your day go?" "I dug some dirt." "I took some pictures." Sweet.

My interest in photography began at a young age when I got my first camera, a 35mm for my birthday. I loved being able to capture moments with just a quick release of a shutter. My degree is from Utah State, and through school I was able to learn many basic and wonderful theories of art, which help me in photography immensely. The technical knowledge I now have in photography is largely self taught, and I am still on the road for more knowledge. I love it. I love people and combining the two is so rewarding.

Hi everyone...Stacie here...and most of you might already know me...but in case you don't here's a little background:   I am a mother of four crazy, but fabulous kiddos {2 boys & 2 girls}... and a wife to one amazing man!  {Sometimes I wonder how I became so lucky. :)}  As you know,  I am a HUGE crafty junkie who is always trying to think up different things to create in my spare time.  I was born in Utah...but grew up and currently live in Idaho. Go BSU!! :)   My family and I love the mountains and enjoy camping and 4-wheeling together!   

My interest in photography really began when I started having children.  I LoVe taking pics of my kids!  I found myself photographing every little step, and sweet moment of their lives.  It wasn't until last year when I bought my first DSLR...and decided to branch out and start learning more about the whole tech-y part of photography...and completely fell in LOVE!  It is AMAZING!   I still have a TON to learn...but I look forward to every minute of it!  I recently started a photo blog here...where you can check out some of  my most recent work!   

I just have to say...I am sooo excited that Camilla has joined the "Crate" on Friday's!  She is the sweetest person...and I am so thankful to her for her willingness to share her amazing talent with us!

So now that you know us, we can get on to photography! Photog Friday will go as follows:

1st Friday: "Beautify It."
This is where you will take a sooc image (straight out of camera) from Stacie, I, or one of you and we all edit it in photoshop using whatever techniques we know/love. This can also be done at picnik.com for those who don't have photoshop. You will then come back and link your image so we can all enjoy/learn together!

2nd Friday: "Photog Tidbits."
This is where Stacie or I will share a quick easy lesson on improving your photos by shooting in manual, lighting composition, or artistic composition.

3rd Friday: "Better After."
 This is where we will take a specific photoshop technique and show you how its done to improve one of your own photos of choosing. Then we will all link back our photos showing how we used this technique.

4th Friday: "Photography Challenge!"
 This is where you will take whatever camera you have and shoot under a specific theme! I love these! Themes can be colors, shapes, moods, etc and your photo will be whatever speaks to you under that theme. We will all post back in order to help each other and improve by all the talent I know is out there!

Welcome to Photog Friday!!
 We are excited to have you all participate and we will learn together! Like 3rd grade, only cooler. Our first Friday, December 3rd, we will be working on this photo:
Photobucket
Isn't she beautiful? I had the privilege of shooting this young lady for some ad work. It is straight out of camera, shot with a Canon 50D and 17-70 Sigma Lens. ISO 640, f/5.6, 1/250s for all who like number crunching, if you have no idea what the heck I just typed, no worries! ;) Have fun! Just download it from photobucket and have at it! Then come back and link to your specific post on your own blog. The link you can post at will be up on the 3rd. We're excited to see what you come up with! And remember, use http://www.picnik.com/ if you don't have photoshop.
Happy Photog Friday!


Friday, November 19, 2010

Photography Friday!!

Photobucket


Welcome to the FIRST installment of Photog Friday!!
 
My name is Camilla from CioCo Photography and I am oh-so-excited to be here at the Creative Crate with Stacie. I, along with Stacie will hopefully rock your socks off with some awesome photography posts, photography challenges, and fun photo shop makeover shares.
Next week you will get to know me and Stacie (as in the fabulous photographer Stacie, not just the amazingly crafty and cute one) but today we want to get to know you! So please take the following poll so we can know a little better where to aim the tutorials, lessons, etc. Please feel free to enter any additional comments you have at the end of this post.
Happy Photog Friday!

Friday, July 16, 2010

DIY Photo Art!

Here is a FuN photo art idea that I made for my sons room!

I took this pic of him...and sent it into Costco to have it enlarged to a 20x30 which cost only $8.99! {LoVe the price...and how it turned out!}


Then I went to the dollar store, and bought a piece of foam board which happen to be the same size of my pic. {20x30} ...and bought some of this spray adhesive @ Walmart. {If you don't want that large of a picture...just cut the foam board down to the size you need... with a box cutter or exact-o knife.}


Then... I sprayed the foam board with the adhesive giving it a good, even, thin coat...


Then stuck the picture on ...and smoothed with my arms {because my fingers were sticky} starting from the center pressing to the outer edges trying to eliminate any air bubbles...then let completely dry.

And there ya have it!

Such a FuN and {inexpensive} way to add a personal touch to any room!

Also...check out this other FaBuLouS Photo Art project @ From An Igloo!


So CuTe!!


Monday, June 14, 2010

DIY Photo Art!

From these:
To these!

I came across this FuN photo art idea @ Kristin Duke Photography! First of all...Kristin does {amazing} work...secondly...what a FuN {inexpensive} way to display it! She spent a total of $21 on this project! I absolutely LOVE wall art especially when it involves photos of your kiddos...and here, she nailed it!!

Check out her complete how-to... HERE!

Kristin...thanks so much for sharing this FaBuLouS idea!


Don't stop here...Click on "OLDER POSTS"!!