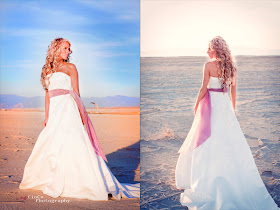
Hello everyone! Camilla here from CioCo Photography. Remember how I'm a horrible slacker and haven't been here for weeks? I apologize to Stacie because there isn't much excuse. I have been busy, wedding season is about to explode so I've been doing lots of engagements and bridals. Love it though! Today I'm going to talk a little bit about light composition .
A few nights ago I was at a session around 5:30 pm. (Sun set that night at 6:30) The light was soft, and well rounded, which is why you'll see a lot of photographers active at that time of night, racing the sunset to get the perfect shots in. Golden hours for lighting: 7:00am-9:00am in the summer, 7:00-9:00pm in the summer, and 4:30-6:30 in the winter until day light savings. Here is what I saw a lot at my session:
Shade can be very valuable during a session. Especially OPEN shade. That is within three-four feet of the shade line. Here is a picture I took in open shade:
Shooting in open shade allows your images to be rounded, light and beautiful. It eliminates shadows on the face and gives you the portrait look you want. CLOSED shade will require your camera to read the light more, and produce a slightly grainy image. Although the diagram does show closed shade, most of the shade is open.
So what do you do when there is no shade to be found? Or you have to take pictures of your family at 1:00 in the afternoon? Here are a few tricks I've found helpful.

This wedding was shot around 12:00 noon. Not great lighting at ALL. You will notice the shadow elimination isn't perfect, but the result is good considering. I used two things on the photo:
1. Reflector. Reflectors are helpful in bouncing the light back up into your subjects face. It also isn't necessary to buy pro level reflectors to get this look. Have you noticed those silvery car windshield blocks that are silver on one side and black on the other? I think you can get them for $5 at Walmart and they will produce a similar effect. Hold the reflector in the direction of the sun and move it till you see it bouncing on your subject. Its the same idea as trying to blind someone by reflecting a shiny piece of medal into their face. :)
2. Fill flash. Your camera most likely comes with a built in flash. Turning on the flash even though their is sufficient light will make a HUGE difference in shooting full sunlight.
Here is another example of when I needed to shoot full sun, just near sunset:

Here we have two examples of the same position, one shot with the sun as the main light, the other with the sun as the BACK LIGHT.
3. Back lighting a subject will help greatly. The use of fill flash or a reflector is necessary however, otherwise your camera will read the exposure of the sun and your subject will be dark.
4. Find a dark background in full sun. None of these images show that, but if you are shooting full sun, it is helpful to put your subject in front of dark trees, per se, and then take the picture. That way the camera doesn't have to expose for the sky with sun.
**If you are using an SLR- expose properly for the face and wash out the back. In the second image expose correctly for the background and then combine the two in Photoshop. An easier way would be simply to use reflectors or fill flash*
I'm not going to lie though, even though I know the principles for shooting in the sun, I hunt for shade like nobodies business. And I schedule all my shoots in the golden time. Here's that same little girl shot RIGHT after the sun goes down. (You have about 20 minutes of great shooting time once it does)
All of these images have been photo shopped, but the base you start with needs to be workable. I have mentored other photographers who have said, 'I'll just fix it in photoshop later'. I understand the sentiment, but it's not good and won't produce good images. Photoshop is like makeup, to enhance what is already good about the image. It can't cover up everything. ;)
Enjoy shooting! We'd love to see your images using some of these principles, we understand many of you know the how to already. Have a great Weekend!
Camilla...you are AWESOME (as always :) ) and you totally don't have to apologize :) Thank you so much for all you do! BTW...your images are GORGEOUS!! Here is my example of an image that I recently took at a senior shoot in OPEN SHADE: I definitely have to agree with Camilla on the Photoshop philosophy. If you produce a good image to begin with...then adding a little enhancement after...is the icing on the cake! Thanks again Camilla for your FaBuLouS info!! Ok...let's see those link-ups!!!


